Feeling inspired

I went for a walk at my absolute favourite place this side of the equator…

image

This is Burrator reservoir on dartmoor and it is absolutely stunning, especially on the first nice weekend in months.

So I came home and baked some jaffa cake cupcakes. Plain sponge with a marmalade core and a chocolate ganache topping. The perfect antidote to all of the walking I did earlier.

Monochrome cupcakes – attempting to look chic.

This week was our college assessment. Our brief was to decorate 12 cakes showcasing different skills in any colours that we want. I wanted a coherent theme with all of them for two reasons. One, that it looks better, two because it is easier. If I am only using 3 colours I am wasting less and not having to think about different combinations of colours. So I chose Black, white and pink. In the caking world it’s a monochrome colour scheme as it’s one colour against black and white. So this is a simple blog, I will put the photos up and detail the techniques I used. I severely underestimated the time it took to decorate these cakes. I had to do working drawings for them which is a massive help as I could plan ahead what sugar flowers I had to make and what to mix ahead of time and drying times etc. Here goes…

Image

Buttercream with sugarpaste flower and sugarpaste pearls. I used a 57L (cos I’m a leftie) for the buttercream (1 part butter 2 parts icing sugar) and a 50:50 flowerpaste sugarpaste mix for the flower. I always use 50:50 for the flowers like this and on all the detailed bits on the future pictures in this post. I don’t like this cupcake purely because it looks NOTHING like the working picture!


Image

This is an iced and hand painted/stenciled cupcake. I did a buttercream base to level the cupcake and using sugarpaste I rolled out and used a cookie cutter to make a disc, I put it on and using a smoother/planer I gently worked the icing into the paper to form the base of icing. I used this technique on all the sugarpasted ones on this post. Next mix some powder colour with clear alcohol to form a paint and go nuts. Or do what I did and use a stencil.


Image

I have done these before for the Valentine’s roses. A 2D nozzle swirled from the centre out. Simples!


Image

Sugarpaste base like the hand painted bird cupcake but with silicone moulded black and pink roses.


Image

For this one I made the handle in advance and let it dry so it holds it’s shape. I then rolled out the bars by sausaging it but then using a smoother/planer to make small even rolls then just glue them on using edible glue. Add on a couple of cut out flowers with sugar pearls et voila!

Image
Before I put the icing I rolled out on the cake, I used an embossing rolling pin to create the fleur-de-lis pattern. Once I put it on the cupcake I dusted it with a lustre dust to really highlight the embossing. Cut out flowers to top!


Image
This garrett frill cupcake was made by cutting out the 50:50 with a scone type cutter, you can see the shape I mean, and using a bulb shaped modelling tool to frill it out a bit and give it dimension. Cover it with flowers and make it pretty.


Image

These are the mini cakes I made. I didn’t let the marzipan underneath dry long enough so they look a little dumpy. So not chic. But the techniques on here are similar to the ones I already described so I don’t want to bore you any more.

One final photo of my assessment presentation…

Image
As it turns out, the assessor couldn’t make it so our tutor did the assessing and has sent photos to the mystery assessor to make sure she didn’t mark us because she likes us (or not) so I still don’t know if I have passed or not. We will find out next week, during our cookies assessment. Fingers crossed.

Valentines Love

I didn’t have a Valentine of my own this year (aaaaw) but I thought I could play cupid for any of my coupled up friends by baking cute little rose cupcakes. Who could resist a dozen red roses, especially when they are edible.

I started with a basic pound cake mix. I always add a dash of milk to moisten up the cake too. Some recipes call for dry ingredients to be mixed first but I just throw it all in and am yet to have a problem!ImageImage
Then it’s time for the baking. I use an ice cream scoop to keep an even amount between all of the cases which adds a consistency to the entire look of the cakes. For the rose cakes, they need to be a couple of millimeters below the case line as to need to have a buttercream base for the piped rose. But before we get on to that you need to bake the cakes. Depending on the oven depends on how long they need. I have my oven at 160 celsius and it can range from 15-20 minutes. As long as the skewer comes out of the cake clean then it is cooked. Next I put a raspberry jam core in. This is a little annoying and fiddly but it adds an extra edge to the cakes. Using an apple corer I take out the centre of the cupcake and put a chuck of jam in the middle. Then replace the core and they should look something like this…
Image
The buttercream base is then liberally scraped on top like a slab of butter. The way I was taught is to hold the cupcake in your hand and using a small palette knife, spread the buttercream towards you from the centre, rotating the buttercream with each swipe. Over fill the cup with buttercream but then level the excess off of the top. By over filling then removing you are less likely to create ripping of the cake or the case being pulled from the side.

Next is the rose. I coloured the buttercream in red for obvious reasons, and added a dash of milk to make the buttercream smoother for piping. Fill the icing bag with a 2D nozzle and tap down into the centre of the cupcake and work your way around to the edge in a circular manner. With a flourish pull the piping bag away et voila! Beautiful rose cakes. For a final finishing touch I liberally sparkled them with red edible glitter. Simple yet effective.
ImageImage

I’m now a Patisserie expert. (Kind of….)

So, today I took my sister’s advice (a rare occurence) and went to the Ashburton Cookery School which is only 10 minutes’ drive or less from my house. Now until I booked up on the course I didn’t realise just quite how people viewed the school. Some people I have spoken to from far flung corners of the earth, or outside of Devon at least, had heard of it. To me, it was a place in the next town over what done teachings.

So I arrived at a nicely leisurely time of 9:30am all on my own and was met by a lovely lady at the door to the converted house. She ushered me into a room with some tea and coffee and 7 other people all sat around making slightly awkward awfully British small talk. It took a sinister turn though when one lady commented it’s like the start of an Agatha Christie novel, 8 strangers in a room, only 7 will leave. We then segued onto Miss Marple and how the new one isn’t as good as the old one, and it isn’t as good as Midsomer Murders or Murder, She Wrote. I want to point out that none of us were at retirement age either. Then the baking starts.

We all went to the next room which had been converted into a teaching kitchen…

Image

We had loads to cover in 6 hours – Pain au Chocolat, Pain au Raisin, Maple & Pecan Danish, Chocolate Eclairs and Profiteroles, Croissants and Macarons. We had a demo of how to do the macarons as we didn’t have the time to make them ourselves and there were only two types of pastry that we were using which made it a smidgen quicker. So we started with the Eclairs and Profiteroles. In all of the caking I have done I have never made pastry so I was expecting it to be a complete failure. But Tom (our chef) made it all sound and look so easy soooo it must be, right? Well out of the 4 pairs who did it, we all had different results.

Image

The choux pastry has to be mixed together and put on a medium heat for all sorts of sciency reasons, then spread over a tray and let to cool…

Image

More pastry science and mixing and it is put into a piping bag and piped into £1 coin sized mounds for profiteroles and in three ribbony long layers for eclairs. After 15 minutes in the oven we removed them and put holes in the bottoms, turned them upside down and let all of the steam out and cooked them a little bit more. These beauties then emerged…
Image
With this being only part of the goody bag two of us is taking home, I could feel my arteries clogging up already, and it made me SO HAPPY!
Next up we have le croissants. In my head I just sang that like the french chef sings Les Poissons from The Little Mermaid. Anyway we had to make croissants. The next pastry process is a proverbial ball ache. Make the pastry, fold the butter, refrigerate, fold a bit more, refrigerate, turn and fold. It is simply annoying because we needed it to be rectangular and as is the way with baking with yeast, it is a springy devil so it was difficult controlling it. To make the basic shape of the croissants you make long isoceles (sp?) triangles and roll the bottom edge up and then tuck in the ends to make the croissant shape we all know and love. Proof. Bake.
Image

Next on the list is Danish, which you cut the dough into a square and like you made paper windmills in primary school you cut into the centre from the four corners – not all the way though, a £2 coin size needs to be uncut. Dollop your filling into the centre and then fold one corner of each cut piece into the centre. So, it would be each right had corner folded into the centre to form the pinwheel look (or paper windmills). Proof, Bake!

Pain au chocolat was the easiest. Roll out a rectangle, put a line of chocolate chips along, and roll up like a sausage roll. Proof, bake!

Then pain au raisin. I forgot to say that we had made creme patisserie and chocolate ganache in between all of these. You spread your creme patisserie over a rectangle of dough then dollop on your raisin mix and then roll it up like a sausage roll. You then wrap it tightly in baking paper, then wrap it tight again in cling film, making sure it is as tight as it can go and then tie the ends. This makes it hold it’s shape a lot better and when it comes to cutting the slices it is even more helpful. We froze them to firm the dough and then sliced them and then proofed them and then baked them.

This is the result of all of our spoils (not bad for a first attempt if I say so myself):
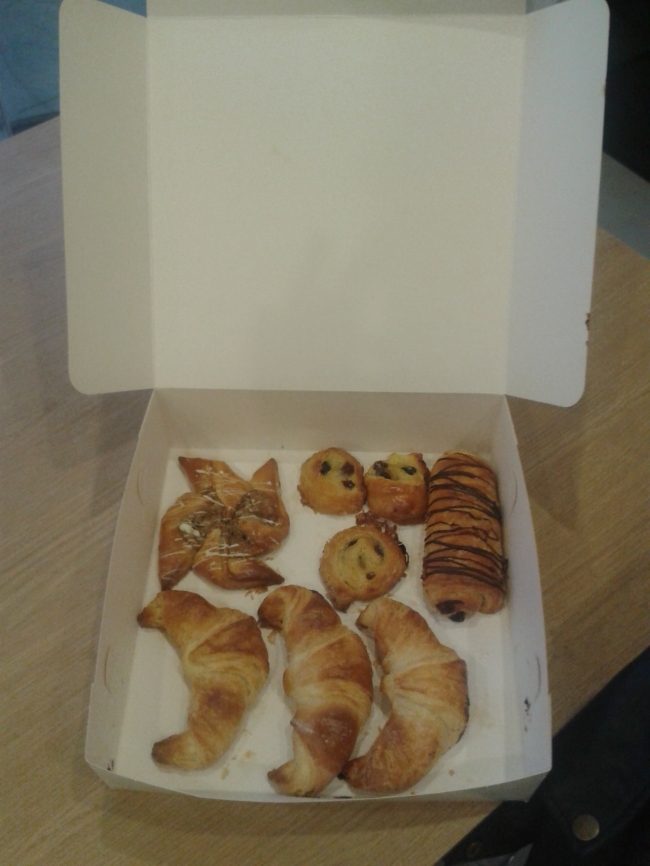
ImageImage
We also got treated to the most amazing lunch and I got a certificate.. LOOK!

Image
I will post all of the recipes in my next post. But you won’t get all of my margin notes. You need to go to the class for those secrets.

Cutesy cupcakes

This weekend I went on a new course to learn how to decorate cupcakes. I have done them before but either with sugarpaste or with the mr whippy style buttercream. This course had 4 different designs so I was keen to get stuck in.

I drove to Bristol for this afternoon course with Rachel Walker who said she has been baking and decorating for years but moved into teaching it because she saw what people were doing and basically thought she could do better. She was great because being self taught there was no pretentiousness and any questions were answered honestly.

We made dozens of sugarpaste flowers and butterflies which I have done before.

image

She then taught how to make a rose out of buttercream which I adored.
image

It took a couple of attempts but I got the hang of it and it is such a simple and effective way to decorate a cake. It also means that there is less buttercream than the mr whippy as I personally don’t like cupcakes overloaded with topping.

Next was a basic sugarpaste topping…
image

We did a rose with a basic flower cutter…
image

You start by rolling a cone out of sugar flower paste and wrap the 12 o’clock petal tight around. Then wrap the 7 o’clock petal, then your 5, 2 and 10 o’clock petals. Such a quick and easy way to make a rose!

Next was the mr whippy…
image

The rose above is what was made with the cutter. Mr whippy style is what you normally see on a cupcake but I really don’t like it. A lot of buttercream for a little cake!

The last design we did is by far my favourite. We piped grass onto the cupcakes and added sugarpaste toadstools and the rest of the sugarpaste flowers. When I brought the cakes home every one was most impressed with these ones. They are so cute and are brilliant for kids parties.
image

I definitely need more practise but I came away most proud of these over any course I have been on, and am having a go at the roses again for a friend’s engagement present so will update on progress of those next.
image

image

image

image

image

Sooooo, where did I start?

I have been baking as long as I can remember. When I was a toddler we had a whole heap of builders that wanted feeding with their tea break in the mornings. My brother and I would help my mum making the cakes – and this was one of my earliest memories. I remember it as being a daily ritual making these cakes. I don’t know how often we really did that either… it could have been once a week, once a fortnight… but it is still a fond memory.

Skipping forward many years, the really un-angsty/angsty teenage years. Instead of consoling whatever made me sad with Ben & Jerry’s, Disney films and bad food – I would bake a cake. I did eat Ben & Jerry’s and watch Disney too, but mostly the cake would be the first stop. To this day if I am feeling blue I would use this default recipe and eat the mix. The cake tastes good, yes, but the mix is the best bit.

These days I want to develop and perfect the art of baking and all of it’s parameters. I am enrolled in college doing a Cake Decorating course – ABC Level 1. I have signed up for a handful of courses over the Spring of 2014 and I also completed a 5 day masterclass with the wonderful Zoe Clark last year.

So the recipe where it all began was simple, 6oz of everything all thrown in together. SR flour, caster sugar, eggs (3 makes 6oz), margarine. A tsp of baking powder and a couple of drops of vanilla to taste. Occasionally a dash of milk to moisten it a little but it is a rare treat. I normally cook it at 160 degrees for 10-15 minutes. I never had a science for it because we grew up in a house with an aga so it was never a definite time. But as long as the skewer was clean what did it matter?

Some recipes call for all of the dry ingredients to be mixed together and then mix the eggs anti clockwise whilst singing the care bears theme tune in the key of A minor. I think some recipes do call for that sort of complication but not basic sponges. Throw it all in and mix it all together. It’s simple.

But it’s not enough. I need to do more and learn more so I am. And that is what I am chronicling.